無料で「ComfyUI」「Open WebUI」などからローカルAIモデルをGPUで動かすDocker環境を一発で構築し動かし続ける「Puget Systems Docker App Packs」


ローカルPCでAIを使い始めるとき、Dockerの設定やGPUドライバの依存関係の解決に時間がかかるケースがあります。ワークステーションメーカーのPuget Systemsが公開した「Puget Systems Docker App Packs」は、1行のコマンドを実行するだけで生成AIや大規模言語モデルの実行環境を自動構築できるオープンソースのセットアップツールです。「ComfyUI」による画像生成から、チーム向けのローカルLLMサーバーまで、用途に応じた複数の環境テンプレートを選ぶだけで、すぐにAIワークフローを開始できます。
https://github.com/Puget-Systems/puget-docker-app-packs
◆最低条件
・x86_64システムでDockerが利用可能
・Ubuntu 24.04推奨
・WSL2も可能
◆推奨条件
・NVIDIA GPU 8GB以上
・CUDA 12.6以上
◆インストール手順
今回はNVIDIAのGPUを搭載したWindows 11上でUbuntuがセットアップされたWSL2にインストールします。以下のコマンドを実行。
curl -fsSL https://raw.githubusercontent.com/Puget-Systems/puget-docker-app-pack/main/setup.sh -o setup.sh && bash setup.sh
インストーラーが起動し環境の確認後「NVIDIA Container Toolkit」のインストールを行うかどうかの質問には「Y」と回答。
============================================================
Puget Systems Docker App Pack - Universal Installer
============================================================
[Preflight] Checking dependencies...
Docker found.
Docker Compose found
NVIDIA Driver found: 595.79 (NVIDIA GeForce RTX 2060 SUPER)
Would you like to install NVIDIA Container Toolkit now? (Y/n): Y
Installing NVIDIA Container Toolkit...
どのような環境を構築するかを選択します。今回は「comfy_ui」を選択。
[Step 1] Select Application Flavor
Different flavors are optimized for different use cases:
--------------------------------------------------------
1 comfy_ui
2 docker-base
3 personal_llm
4 team_llm
Select a flavor (enter number): 1
Selected Flavor: comfy_ui
インストールするディレクトリ名を指定します。デフォルトの「comfy_ui」のままでよいため、Enterキーを押します。
[Step 2] Configuration
Enter installation directory name [comfy_ui]:
インストールが完了すると以下のメッセージが表示されます。
Success! Application installed to 'comfy_ui'.
次に利用するモデルを選択します。今回は「SDXL Turbo (FP16)」を選択。
GPU Configuration:
Found 1x NVIDIA GeForce RTX 2060 SUPER (8 GB each, 8 GB total)
Select a model for your workflow. More models are available inside
ComfyUI via the Manager extension and built-in templates.
-- Pro Image (Extreme detail, production quality) --
1) Flux.2 Dev (FP8) - Requires ~16 GB VRAM
2) Flux.1 Dev - Requires ~16 GB VRAM
3) HiDream I1 Dev (FP8) - Requires ~16 GB VRAM
-- Standard Image (Fast iterations, good quality) --
4) Flux.2 Klein (4B) - 1-2s on 50-series (~8 GB) [Recommended]
5) Flux.1 Schnell - Fast Flux generation (~12 GB)
6) SDXL Turbo (FP16) - Fastest SDXL, real-time (~3 GB)
7) SD 3.5 Medium - Latest SD3 arch (~5 GB)
8) Z-Image Turbo - Fast, high quality (~16 GB)
-- Pro Video --
9) LTX-Video 2B - Best open-source video (~4 GB)
10) Skip - Download models from ComfyUI Manager
Select [1-10]: 6
Downloading SDXL Turbo (FP16)...
モデルのダウンロードが完了したら、コンテナをビルドして起動するかの質問に「Y」と回答。
[Step 5] Launch
Would you like to build and start the container now? (Y/n): Y
コンテナのビルドが完了するとコンテナが起動し、アクセス用のURLが表示されます。
Container started successfully!
Access ComfyUI at:
Local: http://localhost:8188
Network: http://[IP_ADDRESS]:8188
ブラウザを起動し「http://localhost:8188」にアクセスすると、ComfyUIが起動しました。
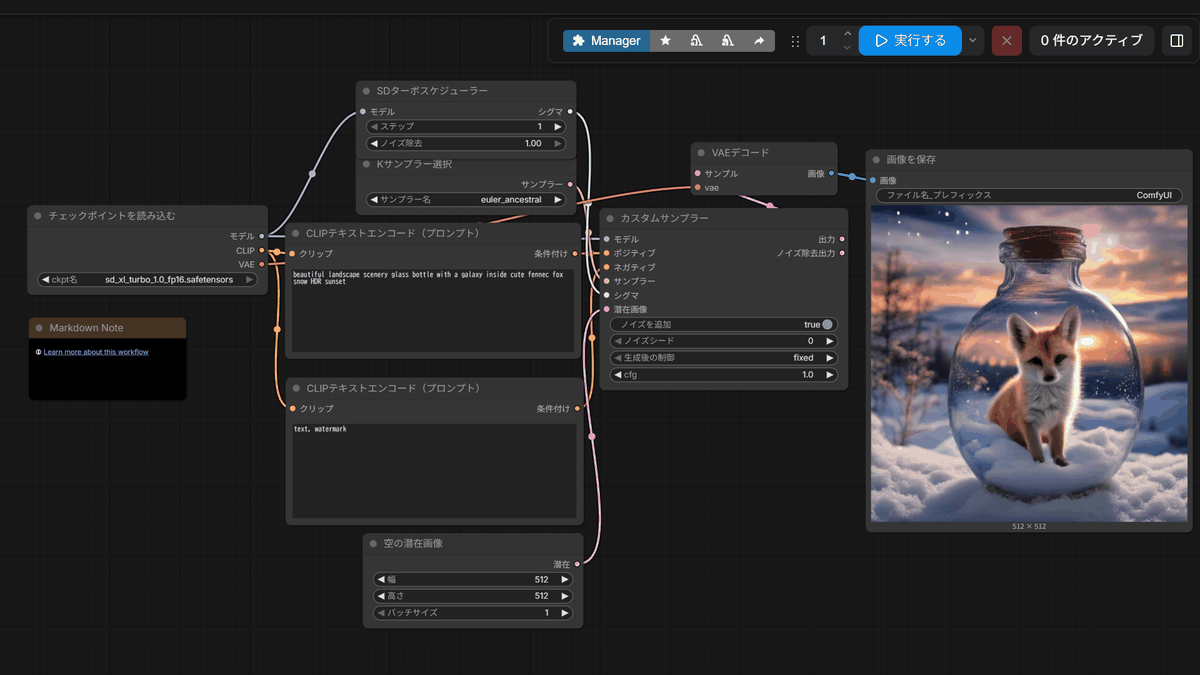
テンプレートの検索ウィンドウを開き「sdxl」と入力し「SDXLターボ」をクリック。

サンプルのプロンプトが入力されているのでそのまま「実行する」をクリック。

テスト画像が作成されます。

「画像生成AIをPCで簡単に実行できる『ComfyUI』のインストール手順&最初の画像を生成するまでの手順まとめ」では多くの手順が必要でしたが、Puget Systems Docker App Packsではワンコマンドでセットアップが完了するので、「手順が複雑で諦めた」「途中でエラーが発生し挫折した」という人もこの方法ならすぐに使い始めることができます。
